Keypad Control for new (WiFi Capable) controllers.
The LCD has 2 lines, 16 character positions each. The displayed data depends on the mode, and possibly also on user scripting.
The keypad has 5 keys:
 (UP),
(UP),
 (DOWN),
 (ON),
(ON),
 (CYCLE),
 (OFF).
During normal operation, the power controller LCD and keypad interface can be in one of the following modes:
Changing Keypad Modes
You can cycle through the modes by pressing and
keys simultaneously.
*Tip - To cycle modes, hold down one button, press and release the
other, then release the first button.
E.g: Press and hold the Down button then
press and release the Up button
then release the Down button.
** Repeat the step to exit configuration mode.
If the keypad is locked via web UI, the keypad doesn't work, and if you
press a key, a message about this is displayed and stays in place until
the next update of the LCD data; no action is taken.
Locking Outlets
Holding ON or OFF down for a few seconds has a locking effect. For example, if an outlet is currently in the ON state, it can be locked in this state by long-pressing '1'. A star appears, ie:
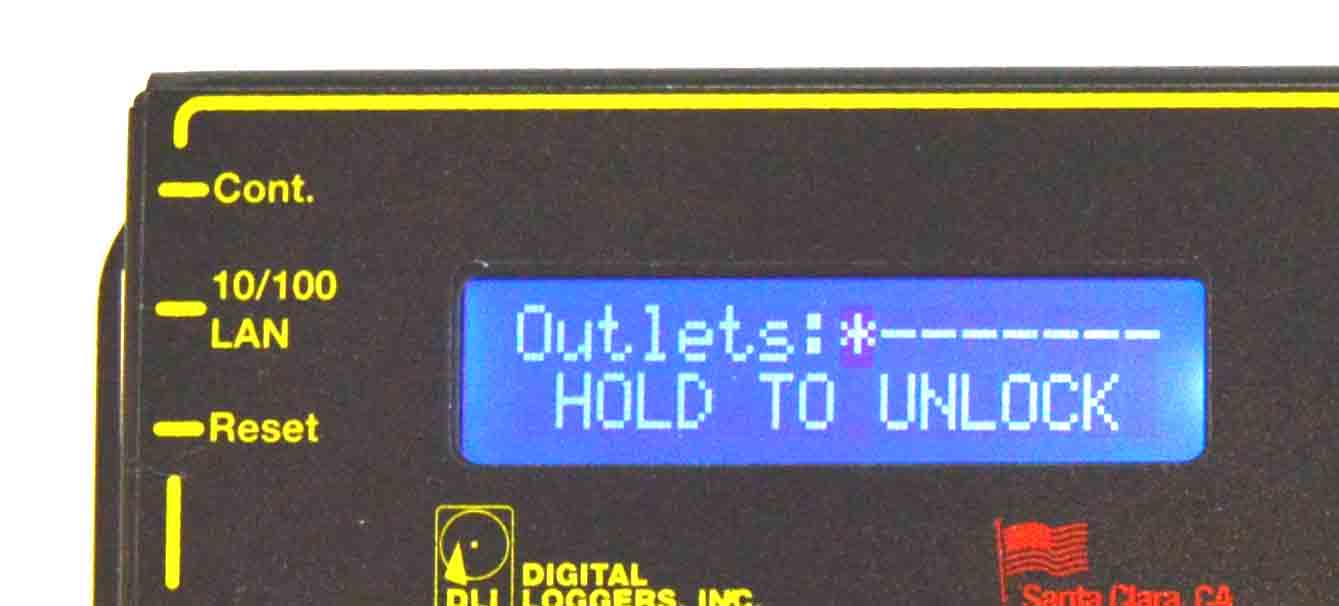
Press '0' and hold for a few seconds to unlock. Similarly, if the outlet is currently in the OFF state it can be locked by holding '0' and unlocked by holding '1'.
Outlet mode
At boot, LPC9 starts in Outlet mode.

In Outlet mode, the and keys allow to choose the outlet to display. The
first line shows states of all outlets.
The selected outlet is marked by a blinking cursor. Its name is displayed on the second line.
If the outlet is not locked (see below) and its physical state matches the expected state, it is displayed as:
 for outlets that are on, or
 sign for outlets that are off.
If the outlet's physical state doesn't match the expected state, (e.g. it will be switched on in sequence ), its state is marked by:
 for outlets that are physically off, but should be
on, or
for outlets that are physically off, but should be
on, or for outlets that are physically on, but should be off
(this should be rare).
for outlets that are physically on, but should be off
(this should be rare).
The button switches the selected outlet on, likewise the button switches
it off.
You can press and hold each of the buttons for 3 or more seconds to lock
the outlet in the corresponding state. Locked outlets can't be manipulated
from web UI or with scripting, and won't be switched by using the hardware
/ keys unless you hold the corresponding key for 3 or more seconds to
unlock it. Locked outlets are displayed as:
 for outlets that are locked off, or
 for outlets that are locked on.
The button cycles the selected outlet unless it's locked.
Managing outlet lock state can only be done using the LCD and keypad
(unless you enable SSH). Locked outlets' states cannot be altered, and
they are not affected by power loss recovery mode.
Network mode
In Network mode, the and keys allow to select the network parameter.
The selected parameter name is displayed together with its current value.

Network configuration submode
Hold down the Down button then tap the Up button
and release both at the same time.
Most values can be changed. Pressing the
button allows to change the parameter. The leading character of the first
line, previously a whitespace  , becomes an asterisk
to indicate that.
, becomes an asterisk
to indicate that.
Different kinds of values are changed in different ways:
/ keys cycle through the available options; / keys increase or decrease the mask;; the / keys
increase or decrease the current byte's value; , or buttons generates a new key;the WiFi SSID can't be changed from keypad.
Pressing
saves the current value and starts network reconfiguration if needed.
The display isn't updated instantly, and you need to refresh it by pressing
/
. You can cancel editing at any time by pressing .
Feedback. Suggestions? Email
engineering@digital-loggers.com