
Advanced Power Control
Scripting for Wired-Only Ethernet Power
Controllers
For scripting a WiFi enabled product such as the PRO, DIN4 or EPCR 5/6/7, click here
On its own, a power switch isn't very smart. Add custom functionality using the built-in BASIC scripting language. It's really simple. No programming experience is required. Have a look at the sample scripts. Give it a try. Need help? Call (408) 330-5599 or send an email.
Hardware Requirements
User-defined program scripts are stored in non-volatile EEPROM. The Web Power Switch 7, DIN Relay III, C-13 Power switch, and Ethernet Power Controller III include expanded EEPROM. On early units built before 2011, a memory upgrade may be needed for script storage. Script controlled LCD, clock-calendar, metering, and RS-232 transmission functions are limited to products with corresponding hardware features installed.Entering Scripts
First, review the commands and samples below for a quick overview of the BASIC script language. Log in as admin and use the Scripting link to access the programming page. After entering a command on each line, press EDIT, or just return and the command will be copied. If there's a syntax error in the command, the screen will refresh without changes. After you've entered a script, check the "Enable Scripting" checkbox. Once enabled, start the script using the RUN button or any other method below.Supported Commands
You may enter up to 127 of the commands below. Commands are executed in sequence with a "step delay" between each command. The step delay can be as short as 1 second (one command per second) or slower if you desire. Enter BASIC commands from the list below one at a time in the Script Listing section on the page e.g. http://192.168.0.100/script.htm. Press "Edit" after entering each command.Multiple Threads
For advanced users: A thread is a process. You can run a multiple programs, or the same program up to 63 times simultaneously. Multiple programs may be run by multiple threads. Code space is shared. Up to 63 threads may run concurrently. Be careful when starting threads, it's easy to start multiple simultaneous threads unintentionally.Starting Scripts
There are several ways to start scripts:-
On power up
This feature automatically starts a script at Line 1 when scripting is enabled and power is first applied or when power is restored. Bad code? No worries. Pressing the "reset to defaults" button will disable scripting. Leave "END" in line 1 of the script page if you don't plan to use power-up execution. Start your script at LINE 2 or later if you don't want it to run automatically on power-up.
-
By another thread - RUN NNN
One thread can create another by using the RUN NNN command. For example,10 RUN 50 creates a new thread at the line 50. The execution of the parent thread continues at line 11.
-
By Entering a URL
To run a script via a URL, first log in and authenticate. Next, the URL: https://Your_IP/script?runNNN=run to start execution at line NNN. For example, http://192.168.0.100/script?run020=run starts script execution at line 20. Please log in first, or you'll be redirected to the login page.
* Three digits for the script line number are required
-
Using cURL or a similar function
You can authenticate and start a script using cURL tool. There are library and command line versions of this tool. For example, cURL http://admin:1234@192.168.0.100/script?run020=run starts a script on line 20 at the default IP after authenticating admin with password 1234.
* Three digits for the script line number are required
-
Via programmable web links - Handy!
To make things convenient for end users, the programmable web links on the left side of the page can can be assigned a target of the form "script?run002" You can use this feature to create a desktop shortcut icon to start your script.
-
By manually clicking the Run button
Once scripting is enabled, you can click the "RUN" button to the right of any line in the script.
-
Via AutoPing
The AutoPing system can be configured to automatically start execution when IP connectivity is lost. Enter the line number to execute in the Scripting box to the right of the corresponding IP on the AutoPing page.
Enabling/Disabling Scripting
You must disable scripting (uncheck the enable box) to stop all
threads before editing scripts. You must enable scripting
before any script will start. Pressing the hardware
reset-to-defaults switch resets to the default login and
disables scripting. Instead of clicking "EDIT" after entering each
command, you can just press enter.
Stopping a Script
A script terminates automatically when the END command is reached. Click STOP ALL THREADS to stop everything manually. You can also stop all scripts via http using http://192.168.0.100/script.cgi?stopRelay Debounce Warning
Even with the scripting step delays, it is possible to create a script which will rapidly cycle a relay. This rapid cycling could result in a over current condition, tripped breaker, or stress to the power controller or attached equipment. To protect against damage to attached equipment or to the power controller, the response time of attached relays is limited by hardware to about ~500ms in newer products. Before running multiple threads, please test your script.Scripting Commands (Instructions)
Parentheses indicate variables. Enter just the variable without parantheses. For example, AUTOPING 1 will look for the IP address stored in string 1.** See the built-in help for more information.
AUTOPING (N)
This command enables autoping at the IP address specified in string N. For example, if STRING 1 is 192.168.0.101, AutoPing will run (per the settings on the SETUP page) at that IP address. Note that AutoPing operation begins only after a series of successful pings are used to establish a reliabile connection.
NOP No operation
Useful as a debugging command, delay, or branch target. Causes a delay equal to the program step delay. Equivalent to SLEEP 0END Ends execution
Terminates thread. Only one thread is stopped.RUN (L) Create Thread
Create a new execution thread at line number (L)GOTO (L) Branch
Unconditional branch to line (instruction) number (L)GOSUB (L) Subroutine Call
Calls a subroutine at line (L) Used with RETURN.RETURN
Execution will continue on the line following the calling GOSUB after the RETURN instruction is reached. Note: Subroutines are "emulated" by new execution threads. The parent counts as a thread. 63 simultaneous threads are allowed.ON (NN) Activate Relay
Turns relays on. ie. ON 123 Turns on 1,2,3 leaving4-8 unaffected (NN) is a list, ie ON 1357 sequentially turns odd outlets on. To prevent excessive inrush currents, the sequence delay timer (On Sequence Delay value in the delay section of the setup page) is used for multi-relay ON instructions. In a DIN Relay, activating a relay closes the NO contacts and opens the NC contacts.
OFF (NN) Deactivate Relay
Turns relays off, ie. OFF 123 Turns off 1,2,3leaving 4-8 unaffected. OFF commands act immediately. In a DIN Relay, deactivating a relay closes the NC contacts and opens the NO contacts.
RESTORE Restores All Relays
Restores all in numeric sequence relays to thesettings before power loss, ie."pre-powerloss" state. Sequence delay timing applies.
CYCLE (NN) Cycles Relays
Turns relays OFF, then ON, ie. CYCLE 13 reboots outlets 1 & 3 The relays are off for a period of time specific in the SEQUENCE DELAY field.TOGGLE (NN) Toggles Relays
Toggles relays, ie. switches a relay OFF if it was ON (acts immediately) and switches a relay ON if it was OFF (sequence delay applies). Equivalent to a combination of OFF and ON commands. Firmware 1.6.9+RESTORE (NN) Toggles Relays
Restores relays to the "pre-powerloss" state.BEEP (T) Activate Beeper
Activates audio alarm in units so equipped, such as the Web Power Switch 7 Use BEEP ON to start a continuous alarm, BEEP OFF to stop the alarm. The beeper can also be activated for 1-254 seconds with BEEP, ie. BEEP 120 will start the beeper for 120 seconds. BEEP 0 is equivalent to BEEP OFF. Beep 255 is equivalent to BEEP ON. More on the beeper here.SLEEP (T) Sleep Delay
Causes a delay. Delay length can be specified in hours, minutes or seconds. Useful for periodic tasks like weekly reboots. See the scheduling page for more information,Usage: SLEEP 1 S sleeps for one second
SLEEP 2 H sleeps for two hours
SLEEP 3 D sleeps for 3 days
All numeric ranges are 0-255
LOG ($) Report to Syslog
Sends string variable ($) to a the selected SYSLOG server at the IP specified on the Setup page.DISPLAY ($) Display Text on LCD
Sends a string ($) to the LCD display (on products so equipped). See formatting commands below.PRINT ($)
Sends string ($) to RS-232 Port 1 on Ethernet Power Controller II/III products, and to the internal TTL serial port on other products. Serial ports may be used to configure or restart routers, Linux machines, UPSs, or to send messages to via modem or SMS. The LCD is organized as two lines of 16 characters each. Find more information on the serial ports here.String Variables
A literal string may be entered directly, ie. "HELLO WORLD". A string may also include text generated by the power switch. These strings are automatically generated and updated by the power switch:The LCD display or serial port may be controlled using these formatting commands, known as "\" escape sequences. They are useful for PRINT and DISPLAY commands. The LCD is organized as two lines of 16 characters each. Below is the list of the sequences and their effect on the LCD display.
TIME ($)
Synchronize with an NTP server specified by its IP address (string $). A special value of 0 is reserved for synchronization with an internal battery powered Real-Time-Clock (RTC) chip, if present. This function is added in firmware versions 1.6.1 and later. Battery powered RTC's are installed in the Ethernet Power Controller II-III, C-13 power switch, Web Power Switch 6+ and some other products. Useful in conjunction with scheduling. Available in firmware versions 1.6.x and later.
KILL (NNN)
Kills (shuts down) all threads started at line number NNN but the current thread. KILL 0 kills all threads. Available in firmware versions 1.6.x and later.
WAIT ($)
Unlike the SLEEP command which just rests for a period of time, this command waits until a specific time and date (set by the real-time-clock) arrives. Specify a time in the ($) field, and when it matches the clock time, execution will resume on the next line following the WAIT command. This function is available in firmware versions 1.6.x and later. The time format resembles that of a popular crontab entry, five fields separated by spaces. Each field is either an asterisk (meaning any) or a number. This "wildcard" feature lets you start programs periodically, for example once an hour, once a day, once a week, only on Friday the 13, etc. Possible ranges are:
| 1 | Minute | 0-59 | |
| 2 | Hour | 0-23 | |
| 3 | Day of month | 1-31 | |
| 4 | Month | 1-12 | |
| 5 | Day of week | 0-7 | Sunday is 0 or 7 |
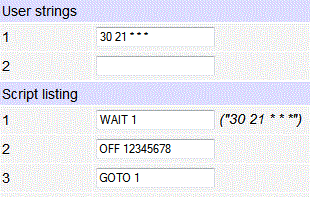
Note, that the condition is satisfied if all fields match. For example the script
1 ON 3
2 WAIT 00 12 13 * 5
3 CYCLE 3
4 GOTO 2
will reboot the server connected to the outlet 3 each noon Friday the 13th.
WOL ($)
Send a Wake On Lan command to the PC specified by its MAC address (string $).
MAC address can have the XX:XX:XX:XX:XX:XX or XX-XX-XX-XX-XX-XX format.
This function is added in firmware versions 1.5.2 and later. More information can be found here.
Sample Scripts
Automatically Reboot a Router, Display the Results, Send a SYSLOG Report
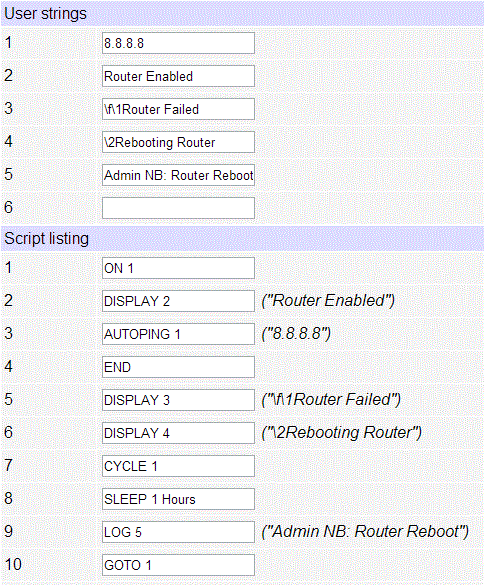
This script pings through the router to an external server farm, in this case Google's multicast name servers, 8.8.8.8 Lines 1-3 start the autoping process and display a message on the LCD. When the connection is lost (see the AutoPing page), it is assumed that the router has failed, so it is rebooted. Execution on line 5 is triggered by AutoPing settings.

Status is displayed to the LCD using the DISPLAY commands on lines 2,5 and 6. Line 7 performs the actual reboot by cycling power to outlet #1. Line 8 gives the router and network some time to recover before monitoring starts again. A message is sent via SYSLOG to the admin with the command on line 9.
The program repeats in an infinite loop, and starts automatically on every power-up.
Print Text to the LCD
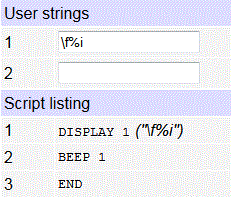
This program clears the LCD and displays the IP address, ie. IP=192.168.0.100 on the
first line of the LCD. Then it activates the beeper for one second and
ends. Since it starts on line 1, it will run every time the unit is
powered up. If you didn't want it to start on power-up, just begin on line
2 and leave the END function on line 1.
Display Power Status on LCD

This example displays the voltage and current readings on Bus B (using the
meters in the Ethernet
Power Controller). The reading is updated every 5 seconds.
Ring School Bells at 8AM on Mondays
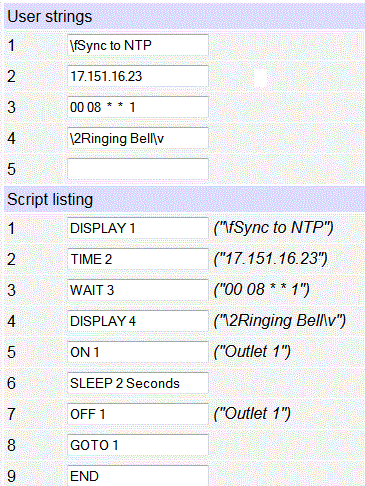
In this example (derived from an actual customer use), a DIN Relay is used to ring a school bell every Monday at exactly 8AM. The DIN relay first syncs to a public time server, then it waits until 08:00 on a Monday. After that, it rings the bell attached to relay 1 for a few seconds.
AutoPing Example - Restart Devices and Phone Home
Note:
Several AutoPing targets can be "joined" so that the task (be it
a script or simple outlet[s] reboot) will be performed only if
one of the targets responds. "Joining" requires autoping target
tasks be identical. Joined targets can be "split" to work
individually.
Power Monitoring and Reporting to Syslog
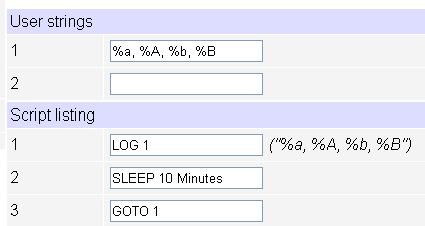
Clicking RUN
1 starts a loop which reports the voltage and current from
an Ethernet
Power Controller on each bus
every 10 minutes to a SYSLOG server. Enter the destination
address of the syslog server on the setup page. What better way to
bill your clients for power? Well, you could also use our free Windows
power monitoring utility.
Starting the AutoPing Function on Power-up
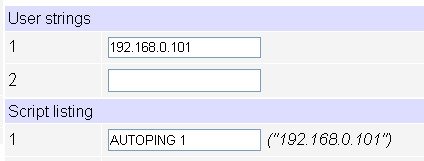
This is a common application. Since the program starts automatically on LINE1 after power-up, this program will activate AutoPing on the IP address 192.168.0.101 whenever power is restored.
Starting AutoPing on Power-up and Restarting it Daily
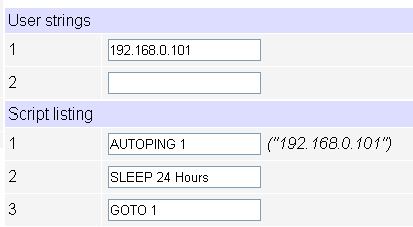
Since scripts start automatically on LINE1 after power-up, this program will activate AutoPing on the IP address 192.168.0.101 whenever power is restored. It will then "sleep" for a day and restart AutoPing automatically the next day. Useful if a device should be restarted later after it exceeds the "maximum number of attempts to restart" set on the AutoPing page.
Fish Tank Controller
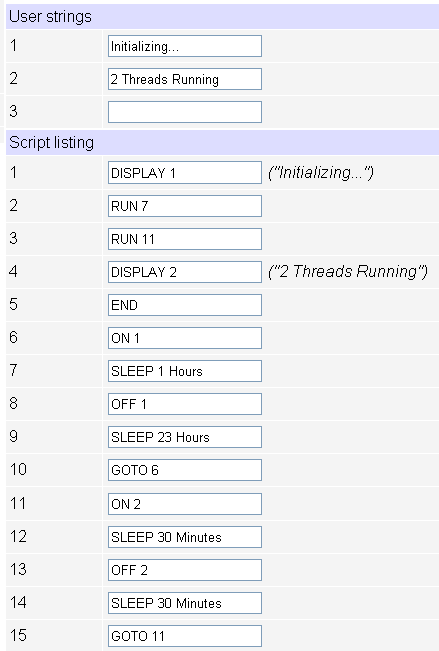
A local pet store uses code just like this to conserver power by controlling lights, air pumps and filters. How does it work? Lines 2-3 start two separate threads. Each thread turns a separate outlet on and off at a programmed rate in an infinite loop.
Simple Lighting Economizer
This simple program shuts the lights off at 9:30PM daily. Users can turn them
on using a web browser. Should they forget to turn them off, the power
switch takes care of it.
Have a smart script or unique way to use your switch?
We'll acknowledge your contribution.