EPCR-7 Controller Firmware Update
Click here for other (non-WiFi) devices.
If updating FROM version 1.11.4.0, the update must be performed using the secure shell (SSH)
Version 1.15.20.0 (12/06/2025)
The main branch for most users.
New features will be implemented in this branch.
Version 1.14.12.0 (03/22/2025)
No new features will be implemented in this branch.
Revision history may be found here

If you have enabled firmware and/or maintenance protection (in the firmware upload or support pages, respectively), you must to disable it to perform the upgrade.
There are two parts to the firmware.
Note: If updating from firmware below 1.7.x.0, update to 1.8.31.0 first. (both parts)
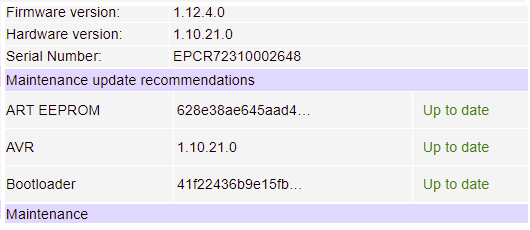
A link indicates the maintenance file file(s) are out of date.
 - Maintenance update recommended
 - Maintenance update not needed
NOTE! Only if updating FROM version 1.11.4.0, the update must be performed using the secure shell (SSH). All other versions may be updated via the Web UI, if desired.
Instructions for updating the firmware via SSH
SSH Firmware Update utility Extract the files, copy the .sysupgrade file into the 'Update Firmware' folder, run 'Update Firmware.bat'
Download:
epcr7_1.15.20.0_update.zip See firmware version 1.11.4.0 warning above
or
epcr7_1.14.12.0_update.zip See firmware version 1.11.4.0 warning above
* Extract the upgrade files from the zip file *
UPDATE PART 1
-Consider enabling SSH in the "General network settings" and back up your settings before performing the update.
Installing the Application (sysupgrade) Firmware Update
NOTICE! The outlets should retain their state, however, it cannot be 100% guaranteed. Outlets turned on via script will likely turn off. In mission critical environments, we recommend preparing for the worst and disconnecting any equipment that must not be power cycled at this time.
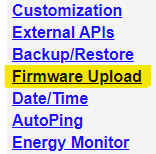
1. From the Main Menu, select the "Firmware Upload" link.

If there is no Firmware Upload listed, use the Reset button to clear protection bits*.
2. Go to the "Firmware Upload" page.
You may want to uncheck the "Beep during upgrade" checkbox then save the changes before proceeding.
Press the "Choose file" button and select the '.sysupgrade file', then press the Upload button.

3. Press the Update button to begin the update process.

The update will take about 3 minutes. The page reload may fail. Wait for about 30 more seconds, then try again.
UPDATE PART 2
Installing the Maintenance file update
WARNING! The outlets will cycle during this update if using a _forcereset file. There is a small chance that they may, in any case. Prepare ahead of time and disconnect any equipment that should not be power cycled at this time.
If the firmware version is a link, then a maintenance file update is recommended.
 - Maintenance update recommended
 - Maintenance update is not needed.
(not a link)
- Maintenance update is not needed.
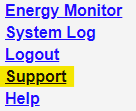
(not a link)Click on the "Support" link in the main menu.

Here, on the Support page, you can see the maintenance update recommendations.
If no update is needed, the update file will do nothing. So, there is no need to continue even if the versions do not match.
In this case, the functional code has not changed.

Otherwise, it will update the firmware as needed.

If an update is needed:
1. Go to the Maintenance section of the page. If it says "Maintenance mode has been protected", use the Reset button to clear protection bits*.
2. If the "Confirm operations from keypad" is checked, you can uncheck it. Otherwise, you will need to press ON to confirm the update or OFF to cancel within 10 seconds after starting maintenance. If you don't confirm within ~10 seconds, the operation will be cancelled.

3. Press the "Browse..." button, select the ".maint" maintenance file and **press the "Start Maintenance" button and follow the instructions on the LCD unless you unchecked the "confirm operations from keypad" checkbox described above.
4. The unit will begin updating. After about 2-3 minutes, you will hear a beep. The unit will be available about 60 seconds after the beep.
Note: If updating the bootloader, it could take a long time - up to about 15 minutes.
If you need or desire to update the AVR version and it did not update automatically, use the _update.avr file to force the update.
*To reset protection bits, press the reset button near the RJ-45 Ethernet connector and wait about 5 seconds. You will hear a beep and arrive at the reset menu. You can use the Up/Down arrows to select the kind of reset. The default is "Clear Lock Bits: Clear protection bits only", which is what you want. Press the cycle button to perform the reset. When the device has completed rebooting, all protection bits, including firmware and maintenance protection, will be cleared.
**Uncheck the "Confirm operations from keypad" box if you do not wish to confirm the operation via the keypad.
It is a good idea to protect the device from firmware updates if it is going to have any public or untrusted access. Both the firmware and maintenance sections are protected via the buttons in their respective web pages.
Thanks for choosing DLI. We appreciate your
and we'll work hard to earn your business!