Using cURL with your power switch.

cURL is an easy API tool for communication with any web-based device.
Download cURL here or learn more about it here.
* Not all curl versions authenticate properly, such as the version that comes with
Windows.
This
version of curl is tested and works well.
DLI
WiFi models include: the DIN
Relay IV, the high power
DC Power Switch, and the Web
Power Switch Pro. These models offer:
•Rest API
•MQTT
•AutoPing automatic reboot system
•Settings import and export.
•HTTPS, SSL, SSH
•An internal Lua scripting language.
To use standard HTTP commands via curl, you'll need to enable "Allow legacy
plaintext login methods" on the newer (WiFi capable) devices.
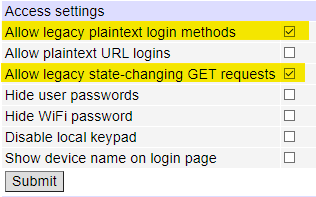
This is not required if using the REST API and digest authentication.
Earlier designs include BASIC scripting.
All designs include cURL compatibility.
Although
the
RestAPI protocall is recommended for new designs, you can easily control
any DLI product (even older models) over HTTP using cURL
in this simple HTTP context.
Python and other languages
work similarly.
** Any authorized user can toggle or cycle outlets, but only the admin user can run scripts.
Sample curl commands. Run a script starting at line 10
// Power ON outlet 1
curl -u admin:1234 http://192.168.0.100/outlet?1=ON
// Power OFF outlet 2
curl http://admin:1234@192.168.0.100/outlet?2=OFF
// Power ON all outlets
curl -u admin:1234 http://192.168.0.100/outlet?a=ON
// Cycle an outlet outlet 8
curl http://admin:1234@192.168.0.100/outlet?8=CCL
// Get the encoded status
curl -u admin:1234 http://192.168.0.100/status
http://admin:1234@192.168.0.
You'll get a result like
this:
<HTML><HEAD><TITLE>Controller status</TITLE></HEAD>
<BODY><div id="state">b5</div><div id="lock">44</div><div
id="perm">ff</div></BODY></HTML>
STATE
   B           5                HEX
8 7 6 5    4 3 2 1    SWITCH
1 0 1 1    0 1 0 1    1=On 0=Off

LOCK STATUS
   4         4                  HEX
8 7 6 5    4 3 2 1    SWITCH
0 1 0 0    0 1 0 0    1=Locked 0=Unlocked

PERMISSIONS (to which outlets can be controlled by this user)
   F          F                 HEX
8 7 6 5    4 3 2 1    SWITCH
1 1 1 1    1 1 1 1    1=On 0=Off
// Run a script -
Legacy power controllers (no Wi-Fi capability)
curl -u admin:1234 http://192.168.0.100/script?run010
// Run a script - Newer power controllers (Wi-Fi capable)
curl -u admin:1234 http://192.168.0.100/script.cgi?run=my_custom_script
or
curl -u admin:1234 --data-urlencode "run=my_custom_script" "http://192.168.0.100/script.cgi"
Here's a sample cURL script for legacy controllers run in a Windows batch file:
REM ******************************************** CHANGE SETTINGS BELOW HERE
********************************************
REM ***** TARGET INFORMATION *****
SET TARGET=192.168.0.100
SET PORT=80
SET USER=admin
SET PASS=1234
REM ***** AUTOPING IPs *****
SET AP1=10.81.150.91
SET AP2=10.81.150.92
SET AP3=10.81.150.93
SET AP4=10.81.150.94
REM ***** OUTLET NAMES *****
REM Use a plus (+) to replace spaces
REM SET CTRLNAME=Rufe+Snow+_+Mid+Cities+Rd
SET CTRLNAME=A+New+Location+_+ID
SET NAME1=NB
SET NAME2=SB
SET NAME3=EB
SET NAME4=WB
REM SET NAME5=Unused
REM ***** NEW NETWORK SETTINGS *****
SET NEW_IP=192.168.11.99
SET NEW_PORT=80
SET NEW_SUBNET=255.255.255.0
SET NEW_GATE=192.168.11.1
REM ******************************************** CHANGE SETTINGS ABOVE HERE
********************************************
REM ***** SET UP OUTLET NAMES *****
REM curl http://%USER%:%PASS%@%TARGET%:%PORT%/unitnames.cgi?ctrlname=%CONTROLLER%
REM curl http://%USER%:%PASS%@%TARGET%:%PORT%"/unitnames.cgi?outname1="%NAME1%"&outname2="%NAME2%"&outname3="%NAME3%"&outname4="%NAME4%
REM ** You can change names one at a time like this
REM curl http://%USER%:%PASS%@%TARGET%:%PORT%/unitnames.cgi?outname2=%NAME2%
REM curl http://%USER%:%PASS%@%TARGET%:%PORT%/unitnames.cgi?outname3=%NAME3%
REM curl http://%USER%:%PASS%@%TARGET%:%PORT%/unitnames.cgi?outname4=%NAME4%
REM ** You can change several names names one at a time like this
curl http://%USER%:%PASS%@%TARGET%:%PORT%"/unitnames.cgi?ctrlname="%CTRLNAME%"&outname1="%NAME1%"&outname2="%NAME2%"&outname3="%NAME3%"&outname4="%NAME4%
REM curl http://%USER%:%PASS%@%TARGET%:%PORT%/unitnames.cgi?outname[5-8]=%NAME5%
REM ***** Scripting *****
REM ** disable scripting
curl http://%USER%:%PASS%@%TARGET%:%PORT%/script.cgi?robdelay=1
REM ** clear range
curl http://%USER%:%PASS%@%TARGET%:%PORT%/script?edit[001-039]=END
REM ** edit several lines at once - again using a + for spaces
curl http://%USER%:%PASS%@%TARGET%:%PORT%"/script?edit001=ON+1&edit002=SLEEP+5&edit003=OFF+1"
curl http://%USER%:%PASS%@%TARGET%:%PORT%"/script?edit005=ON+2&edit006=SLEEP+5&edit007=OFF+2"
curl http://%USER%:%PASS%@%TARGET%:%PORT%"/script?edit009=ON+3&edit010=SLEEP+5&edit011=OFF+3"
curl http://%USER%:%PASS%@%TARGET%:%PORT%"/script?edit013=ON+4&edit014=SLEEP+5&edit015=OFF+4"
REM ** edit just one individual line
REM curl http://%USER%:%PASS%@%TARGET%:%PORT%/script?edit029=END
REM ** enable scripting
curl http://%USER%:%PASS%@%TARGET%:%PORT%/script.cgi?robenable=on
REM ***** SCRIPT STRINGS *****
REM curl http://%USER%:%PASS%@%TARGET%:%PORT%/str.cgi?str01=%AP1%
REM curl http://%USER%:%PASS%@%TARGET%:%PORT%/str.cgi?str02=%AP2%
REM curl http://%USER%:%PASS%@%TARGET%:%PORT%/str.cgi?str03=%AP3%
REM curl http://%USER%:%PASS%@%TARGET%:%PORT%/str.cgi?str04=%AP4%
REM curl http://%USER%:%PASS%@%TARGET%:%PORT%/str.cgi?str05=
REM curl http://%USER%:%PASS%@%TARGET%:%PORT%/str.cgi?str06=
REM curl http://%USER%:%PASS%@%TARGET%:%PORT%/str.cgi?str07=
REM curl http://%USER%:%PASS%@%TARGET%:%PORT%/str.cgi?str08=
REM ***** AUTOPING *****
REM ** Set up auto-ping parameters
curl http://%USER%:%PASS%@%TARGET%:%PORT%"/autoping.cgi?pint=120&pthr=5&ptrl=10&prtr=3&pdel=300"
REM ** Delete any autoping IP addresses
curl http://%USER%:%PASS%@%TARGET%:%PORT%/autoping.cgi?pid=0&del=[0-7]
REM ** Set up new auto-ping addresses
curl http://%USER%:%PASS%@%TARGET%:%PORT%/autoping.cgi?ip=%AP1%
curl http://%USER%:%PASS%@%TARGET%:%PORT%/autoping.cgi?ip=%AP2%
curl http://%USER%:%PASS%@%TARGET%:%PORT%/autoping.cgi?ip=%AP3%
curl http://%USER%:%PASS%@%TARGET%:%PORT%/autoping.cgi?ip=%AP4%
REM ** Enable auto-ping and set script lines
curl http://%USER%:%PASS%@%TARGET%:%PORT%"/autoping.cgi?"pid=0&pen=on&script=1&chp"
curl http://%USER%:%PASS%@%TARGET%:%PORT%"/autoping.cgi?pid=1&pen=on&script=5&chp"
curl http://%USER%:%PASS%@%TARGET%:%PORT%"/autoping.cgi?pid=2&pen=on&script=9&chp"
curl http://%USER%:%PASS%@%TARGET%:%PORT%"/autoping.cgi?pid=3&pen=on&script=13&chp"
REM ***** Last step - change network settings *****
curl http://%USER%:%PASS%@%TARGET%:%PORT%"/network.cgi?httport="%NEW_PORT%"&ipaddr="%NEW_IP%"&netmask="%NEW_SUBNET%"&gateway="%NEW_GATE%"&syslog=0.0.0.0"
Have a smart script or unique way to use your switch?
We'll acknowledge your contribution. engineering@digital-loggers.com