Frequently Asked Questions
Updated 08/06/2019ETHERNET POWER CONTROLLER 7
Download a users guide. Check the specs. Latest new features
Watch the overview video - or call (408) 330-5599 for a free trial
Setup
What is the default IP address? How do
I reset to defaults?
What is the default password?
How do I set up
network access in Windows?
From a Mac? -
Thanks to John McClintock for these MAC tips.
How do I set
up a home router to port forward for Internet access? -Thanks to Mike G.
Find more specific port forwarding examples
here.
How do I use the keypad setup?
General FAQs
What is the current version
of firmware?
What's the new Lua Language
and Scripting all
about?
The session timeout is too short. Can I extend it?
How do the meters work?
What's the DB-9 pinout?
How can I get
a dry contact relay output?
How do I enable AutoPing?
Explain the Auto-Ping
settings
How do I enable Battery
Backup? How long will the battery run? What is the battery lifetime?
How can I access the sensor port?
What's syslog?
How can I keep an event
log?
Can you develop custom firmware or custom
hardware for my app?
Do you have a ruggedized
version? Something suitable for mobile use?
What are the CRITICAL and
PROTECT functions?
Where can I find the
manual or spec sheet
for the earlier model?
How do I set up event notifications?
APIs - Communicating with the power controller
What is the recommended RESTful API?
Have any SNMP setup tips?
How can I connect to Amazon
Echo, Alexa, Dot or Tap products?
How can I connect to Google Assistant or Google Home?
How can I
access the switch from my own application or remote script? What's the
cURL API?
My program ran fine on the Web Power Switch 7 or Ethernet Power Controller 3, but doesn't connect now.
Help!
Is this product compatible
with legacy plaintext scripts and http control?
How can I control the switch from my own applications?
Do you support MQTT?
How can I set up IFTTT?
Do you have a Visual Basic.NET example program?
Thanks to Alan Holmes
Do you have a C++ programming example?
Do you have a .NET programming example?
Do you have a Java programming example?
Do you have a compiled Windows command line tool or a Perl
example?
Do you have a Python programming example?
Do you have a Crestron control module?
How can I run a perl script from
LabView?
Where can I find iPhone, iPad, or Android
apps for Digital Loggers?
Do you support PowerMan?
| Question: | What are the latest new features? |
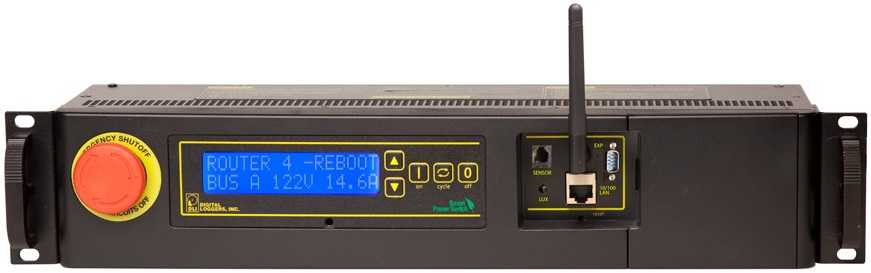
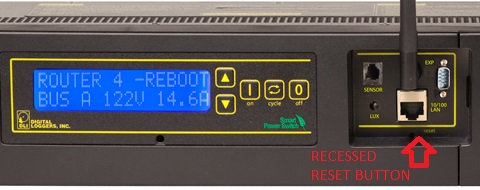
| Answer: | In version 7, we've transitioned to much larger power switching relays. These have a projected life of 1.5 million cycles at 15A load, and a 40A NO rating with silver alloy contacts. We've also added surge detection hardware to track AC line disturbances. On the firmware side, we've added more support for the RJ-12 sensor port suitable for use with DHT11 or DS18B20 type external temperature and temp/humidity sensors. Sensor probes are optional, inexpensive and in stock. New transformers give higher accuracy AC voltage monitoring. The DB-9 expansion port is now fully supported, with ADC inputs, RS-232, and a higher current 400mA open-collector GPIO output bit. The WiFi module has been improved for longer reception range. |
| Question: | What is the current version of firmware? |
| Answer: | You're now on the FAQ page for Ethernet Power Controller 7, P/N EPCR7. Find the revision history here, and firmware update instructions here. |
| Question: | I have a legacy model Ethernet Power Controlller II, III, V, VI,or PC-8000 model. Where can I find information? |
| Answer: |
For firmware information on PC-8000 units without power metering,
(circa 2008-9), click here. For information on the Ethernet Power Controller II or Ethernet Power Controller II LCD (circa 2010 to 2011), click here. The manual for the P/N EPCR3 built from 2011 to 2014 is here. The manual for version 5 built from 2015 to 2018 is here. The version 6 manual is here. You can always call or email for support, no matter how old the product is. We're happy to help. |
| Question: | How does the sensor port work? |
| Answer: | 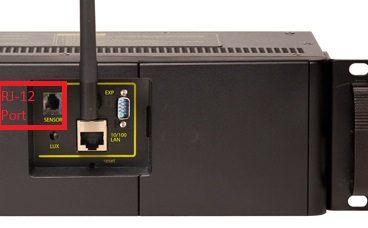
The sensor port is an ESD protected TTL level bidirectional port. It's suitable for Dallas 18B20 or DHT11 style sensors. The RJ12 pinout is: 1 &2 - 5V power out. 5V current is limited to about 50mA. Pins 3 Data (bidirectional) & clock. Pin 4 is ground. The power controller will automatically detect the attached sensor, and it can be interrogated via the RestAPI. There is also a DB-9 connector for expansion or custom-built peripherals. Email engineering@digital-loggers.com with your needs and suggestions. |
| Question: | How do the meters work? |
| Answer: | The Ethernet Power Controller 7 has four internal meters. Bus A and Bus B each have one separate current and voltage meter. The voltage meters measure the input voltage on each bus. The current meters measure the total current drain for all the switched devices on each bus. One un-switched outlet on each bus bypasses the meters to provide un-metered "house power". Keep this in mind when planning your wiring. The un-switched outlets are located in the center of the panel. Although the product will easily handle 15A on each bus, it's recommended to stay in the 13A range or so to leave headroom for dynamic loads. The circuit breakers are a "guaranteed hold" at 14.8A. There is a manual power factor correction which can be entered for each bus to correct known non-PFC loads. Histograms and meter readouts can be customized to suit your needs. Two cumulative energy meters are provided. They accumulate power use over time to display energy in kWh. A power billing / notification utility for Windows is here. Note that the firmware now includes internal notification, so no external utilities are necessary. In version 7, the voltage metering time constant has been changed to ~1500ms. DB9 ADC inputs may also be supported in future firmware releases. |
| Question: | How can I control and customize the LCD display? |
| Answer: | The LCD can be used to display current and voltage settings, outlet status, or a messages of your choice. You can operate the LCD in "billboard" style, displaying a series of user defined messages. To customize the LCD, you'll want to write a script using the Lua scripting language. You can also use the display to send messages from remote systems (ie. service alert warnings). |
| Question: | On initial setup, I can't establish a Ethernet communications from a Windows PC. Help! |
| Answer: |
If your default Windows settings won’t access the controller,
follow
these steps to reach the controller’s IP. You'll find a
more extensive explanation
in the user's manual. Before adding an IP, close network programs and browsers.Go to the Network Settings – Local Area Network or use the keyboard shortcut <Windows-R> - type “ncpa.cpl” and click OK.
Right click on your LAN connection and choose Properties Highlight Internet Protocol and click the Properties button.
Make note of the current settings.Select "Use the following
IP address"Enter an IP address such as 192.168.0.5.Enter a subnet mask of 255.255.255.0.
Delete any gateway entry.Close all windows for the configuration to take effect.
Start your Browser and type 192.168.0.100 in the URL field. The index page should be displayed. The default user name is "admin" (lower case) and password is “1234” Set the IP address of the unit to your network, then restore your settings. |
| Question: | How can I control the switch from my own applications? |
| Answer: |
For new development, the best place to start is
the RestAPI.
You can also download the latest User Utility
which includes PowerMan support for Linux. Your application can use HTTP communications.
There are programming examples from several languages listed in the top section.
|
| Question: | Can you develop custom firmware for my application? |
| Answer: | Gladly. We've done this for many customers. After we agree on a -very specific- project description, we can send you an estimate of the time involved to code, debug and test. Our firmware development team has a current backlog of at least 6 weeks, so if you need something sooner, please have a look at the Lua scripting language. It's relatively easy to use. |
| Question: | Is this product compatible with the older (less secure) HTTP plaintext command syntax? |
| Answer: | To use the earlier HTTP commands described here and CURL scripts that use plantext login, you'll need to enable this legacy setting on the SETUP page: |

| Question: | Do you support PowerMan? |
| Answer: | Yes, absolutely, even in our older models. The latest Ethernet Power Controller 7 compatible code including the new sensor API is on github. |

If we haven't answered your questions here, please call (408) 330-5599 or send us an email.
We'll be glad to help.
© Digital Loggers, Inc. 2018.